I got asked today “So what’s going on with the trailer?” …

Crack in the base.

Crack all the way through.
I was a bit discouraged when I had to replace a cracked vent/fan that I put in last fall and had not even used yet. It was ok for a while, then I had a steady drip flowing into a bucket. After several emails, climbing on the trailer to take a picture in the rain, I was given the go ahead to send it back to be replaced. I removed the errant vent and sent it back, waiting for it’s return with a big hole in my roof for a week during the Upstate NY flood season (plastic covers do turn the finish on aluminum brown). The replacement vent came with a different number of holes in different locations — it kills me every time I have to drill into Rosie’s skin. The weekend I was installing the replacement, I happened to be listening to the VAP episode where Colin and Frank were talking about cracked vents and installation suggestions. I wish I had heard it last fall when I put in the 3 new vents. The irony is that I put these new vents in to stop the leaking occurring with the old vents (as well as to have functional fans). In spite of my whining about the process, the manufacturer did replace the vent, I just had to pay the shipping to send back the cracked one.

Fletch's trailer moving method.
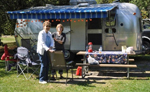
Fletch cut the new metal tube and loaded the new spring for the ZipDee awning. Also ended up with new end brackets and and restraining wheels. I was able to reuse the awning material, but it still wasn’t a cheap fix. It was worth it, the awning is like having another room with the trailer. I will love sitting under it in the nice cool shade at Bash II.

New water intake
Water was leaking into the fresh water tank via the water intake on a regular basis before I gutted the trailer, leaving standing water in the tank to grow algae. I’ve had the intake unhooked all winter with a pan under it for the leak. I don’t have a key to the latch on the original water intake and I couldn’t figure out how to fix the leak. I also could not find an original replacement for the Thetford. I got a new one from InlandRV that is supposed to replace this model, but I had to make the hole in the skin bigger for one dimension and patch it a bit to make it work. The original is much cooler looking, but the new one looks ok from the outside, doesn’t leak, and I have a key for it.
Other small projects have included sanding/painting/rescreening the 6th screen that was in the trailer when it went to Frank’s Trailer Works, scraping off the sealant on the the windows and putting on fresh Vulkum, putting on new rubber seal on the last of the windows (1 more to go), and preparing the step light and flood light for LED replacements. The LED’s have arrived, will install those this weekend. I also ordered new canisters for the tail lights from Vintage Trailer Supply – my jerry-rigged tuna can lights have started rusting and I’m worried about future leaks and now they are making replacements for these. This and many other projects have are a result of my mantra “I should do it while the walls are out.” I really want to be working on the electric, maybe the tail lights work will lead to the interior wiring.
 When Frank reunited the new floor with the shell last year, he made new aluminum wheel well covers. A very nice addition, but it meant having to re-cut the inner skins so it fit over the new covers. I was nervous about messing up the skin (you can’t put it back and it doesn’t grow out), so I used cardboard to create a guide for cutting the aluminum skin. The template got me started in the right direction, but I still had to make several passes and dry fits before it was acceptable. I think it came out pretty well, the bleeding blisters on my fingers from the tin snips are healing.


