13minpaydayloans.com 13minpaydayloans.com

Archive for the ‘Windows’ Category

Redo, reuse, redone

Thursday, May 26th, 2011

I got asked today “So what’s going on with the trailer?” …

IMG_0669_zoomed-in.jpg

Crack in the base.

IMG_0664.JPG

Crack all the way through.

I was a bit discouraged when I had to replace a cracked vent/fan that I put in last fall and had not even used yet.  It was ok for a while, then I had a steady drip flowing into a bucket.  After several emails, climbing on the trailer to take a picture in the rain, I was given the go ahead to send it back to be replaced.  I removed the errant vent and sent it back, waiting for it’s return with a big hole in my roof for a week during the Upstate NY flood season (plastic covers do turn the finish on aluminum brown).  The replacement vent came with a different number of holes in different locations — it kills me every time I have to drill into Rosie’s skin.  The weekend I was installing the replacement, I happened to be listening to the VAP episode where Colin and Frank were talking about cracked vents and installation suggestions.  I wish I had heard it last fall when I put in the 3 new vents.  The irony is that I put these new vents in to stop the leaking occurring with the old vents (as well as to have functional fans).  In spite of my whining about the process, the manufacturer did replace the vent, I just had to pay the shipping to send back the cracked one.

2011-05-03_17-12-52_463.jpg

Fletch's trailer moving method.

Fletch cut the new metal tube and loaded the new spring for the ZipDee awning.  Also ended up with new end brackets and and restraining wheels.  I was able to reuse the awning material, but it still wasn’t a cheap fix.  It was worth it, the awning is like having another room with the trailer.  I will love sitting under it in the nice cool shade at Bash II.

2011-05-22_16-45-10_986.jpg

New water intake

Water was leaking into the fresh water tank via the water intake on a regular basis before I gutted the trailer, leaving standing water in the tank to grow algae.  I’ve had the intake unhooked all winter with a pan under it for the leak.  I don’t have a key to the latch on the original water intake and I couldn’t figure out how to fix the leak.  I also could not find an original replacement for the Thetford.  I got a new one from InlandRV that is supposed to replace this model, but I had to make the hole in the skin bigger for one dimension and patch it a bit to make it work.  The original is much cooler looking, but the new one looks ok from the outside, doesn’t leak, and I have a key for it.

Other small projects have included sanding/painting/rescreening the 6th screen that was in the trailer when it went to Frank’s Trailer Works, scraping off the sealant on the the windows and putting on fresh Vulkum, putting on new rubber seal on the last of the windows (1 more to go), and preparing the step light and flood light for LED replacements.  The LED’s have arrived, will install those this weekend.  I also ordered new canisters for the tail lights from Vintage Trailer Supply – my jerry-rigged tuna can lights have started rusting and I’m worried about future leaks and now they are making replacements for these.  This and many other  projects have are a result of my mantra “I should do it while the walls are out.”  I really want to be working on the electric, maybe the tail lights work will lead to the interior wiring.

Cleanup and camping

Sunday, September 12th, 2010

I camped in the trailer at Robert H. Treman State Park with a couple other trailer folks this weekend.  Robin, Mark, and I took a field trip to Fletch’s and then spent a quiet afternoon hanging out with Robin and mom.  On Sunday, the crew took a hike up the gorge to the upper falls. There was a nice campfire thanks to Mick.  It was such a joy to talk trailers with kindred souls.

I was waiting for Mark's photos since his are so wonderful, but I'll post my crappy one for now.

Last weekend, I finished cleaning off the inside of the exterior walls.  I also finished sorting out the wires so now the only ones running across the ceiling are the exterior lights.  The 12 volt is all removed and the gauge wires are all wrapped up in a bag.  I feel badly that I did not do this before taking it down to Frank, he should not have had to fight with my tangled mess.

I sealed up the front window and I’m still working on the window gaskets for the side windows and adding the fuzzy weatherstripping to the screens as I go.

Window Screens

Sunday, April 18th, 2010

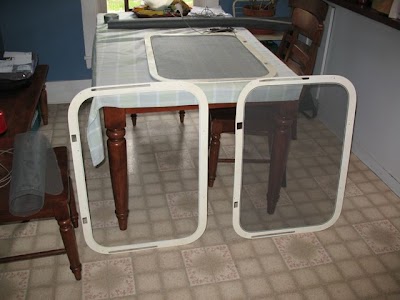
I pulled 5 of the trailer’s 6 window screens out of the basement.  I’m wondering if #6 is still in the trailer.  The basement is full of trailer guts and it’s hard to sort through, but I don’t think I missed it down there.  I removed the old screen material, sanded off the old paint, spray painted two coats of off-white (matches the color of the bathroom fixtures), and re-screened them with new grey spline and fiberglass screening material.  I think they look lovely!

screens1.jpg

And the walls come tumbling down

Sunday, August 23rd, 2009

IMG_0051 Well, not exactly.  After drilling out many rivets with my new Makita (lost count how many) and the removal of electric switches, curtain hardware, window screen, and interior door trim (tricky one), the wall eventually comes out after you de-stick it from its siblings.  The insulation wasn’t in as bad a shape as I thought it would be.  Next section, I’ll take a picture before removing the “pink”, I was overly anxious to see the inside of the outside wall.

Screens while I wait

Sunday, August 9th, 2009

I started replacing the screens while I wait to go to the Vintage Trailer Jam 2009. I’m hoping to talk to infamous Colin Hyde of “Colin Hyde Trailer Restoration”.

New screens

Make it go away

Friday, September 30th, 2005

Well, it rained hard this week for the first time in a long time. Unfortunately, the water is still leaking below the small window next to the door. The antenna cover is also still leaking, but that’s not a mystery.

More windows

Friday, September 23rd, 2005

I read online that I could remove the inside pane of the broken side window by disconnecting the big window arm openers (bolts), removing the big screen (sheet metal screws), the plastic cover over the side window (drilling out the rivets), and then unscrewing the frame of the inside pane (sheet metal screws). Well, I got to the last step and the screws look like they were sealed at the factory with liquid metal.

I tried every implement and tool I have, including a propane torch with no luck. I’m afraid to use an impact wrench for fear of breaking the good pane of glass. Soooo, I took out the broken safety glass by hand (literally) and dug out the 3/8 inch groove of chunks of glass and scraped off the window seal that was between the panes. In the end, I decided it looks fine and will just not have a storm on this window.
Fixed window Fixed window

I couldn’t stand the subfloor anymore, so Cay gave me some floor paint that she couldn’t use because of the color – its pumpkin. Perfect for this lovely fall weather. I put two coats on, only two hours of work and its so nice to have it sealed.

Painted subfloor


Copyright © 2024 Get Out the Map. All Rights Reserved.
No computers were harmed in the 0.166 seconds it took to produce this page.

Designed/Developed by Lloyd Armbrust & hot, fresh, coffee.


Rss Feed Tweeter button Facebook button Technorati button Reddit button Myspace button Linkedin button Webonews button Delicious button Digg button Flickr button Stumbleupon button Newsvine button Youtube button